
With the severe lack of what seems to be serious game developers out there today, willing to release finished games, diving back into what got me into gaming in the first place has become more of a priority. As such, I have become very interested in retro gaming and emulation, specifically retro gaming handhelds.
This was all spurred on initially by my purchase of Valve’s Steam Deck. Not long after I had bought my Deck off my friend, I set it up to emulate many of my old games. The Steam Deck handily emulates anything I used to play. Though even with this capability, I ended up resetting my Deck to defaults to remove the emulation as navigation in Steam was a pain with so many games.
After that I continued to use my Deck until I gave it to my brother. At the time I was eyeing the sale of my desktop and buying an Ayaneo Geek 1S to replace it. Certainly a downgrade but it would free up so much room on my desk at home that it was worth it. And I could take it with me on the road if I so desired.
The Geek 1S arrived and I was very happy with it. I did try emulation on it was well. It’s Ryzen 7840U APU was even more capable than the Steam Deck and emulated things quite well. But, I still felt at this point, for so many old games, this just was not the form factor I wanted. I also wanted a console that I could quickly pull out, power on and play. No dealing with Windows. And honestly, as much as I loved my Geek 1S, the thing was worth $1400 CAD. I did not want to damage it in my daily job (driving a transport truck).
After some research I began to find console makers like Retroid, Anbernic, Powkiddy and AYN. I attribute these discoveries to Russ from Retro Game Corps on YouTube (definitely check his videos out).
At this point I needed to quantify what was important in this case. This is what I needed:
- It must be small, like Game Boy small.
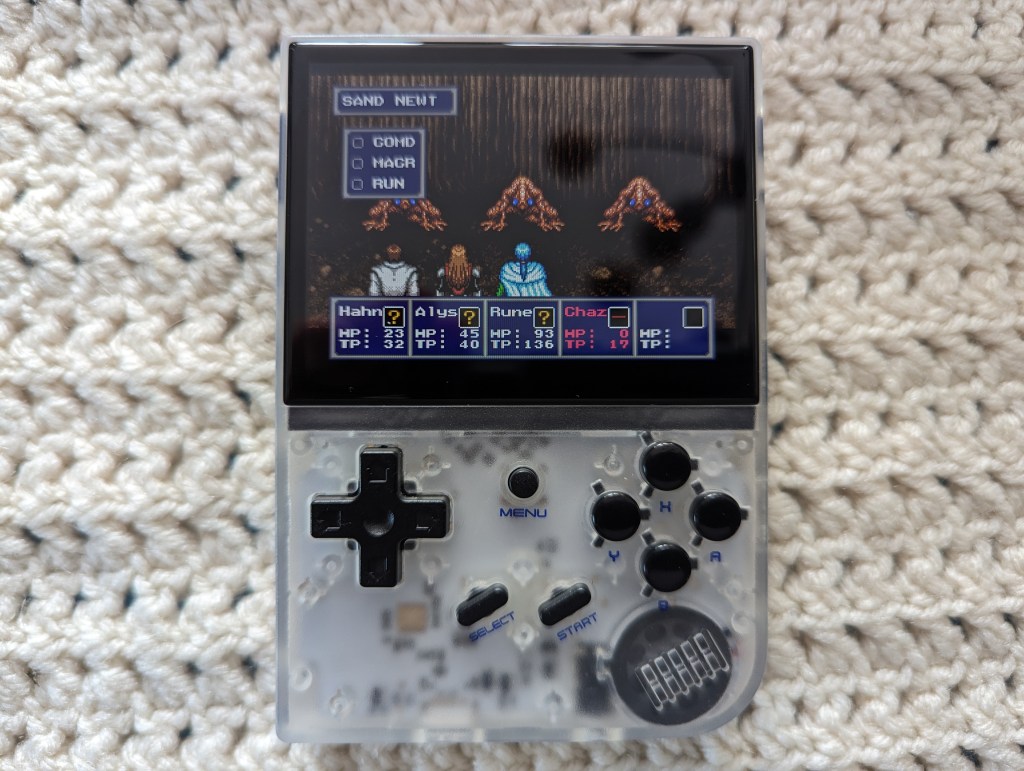
- It must be able to emulate Game Boy and Game Boy Advance (specifically the Pokémon games).
- It must be able to emulate Sega Genesis (specifically the Sonic and Phantasy Star series).
- It must be a quality device.
After a ton of research, there were all kinds of devices that easily fit these criteria. So, I limited the budget to $120 CAD. That narrowed the scope quite a bit. That brought me pretty quickly to the Anbernic RG 35XX and Miyoo Mini+. I put both in my cart and then decided to only buy the Miyoo for now. A few days later, they both arrived. Amazon, and I don’t know how this happened, but I was given leave to keep them both.
The Anbernic came with the console itself, a USB cable, a 64GB Lexar SD card and a quick start manual. The Miyoo Mini+ came with the console itself, a USB cable, a 64GB no name SD card, a USB SD card reader and a pouch. So when it comes down to it, the Mini+ comes with a lot more things at least to get you started which I do appreciate.
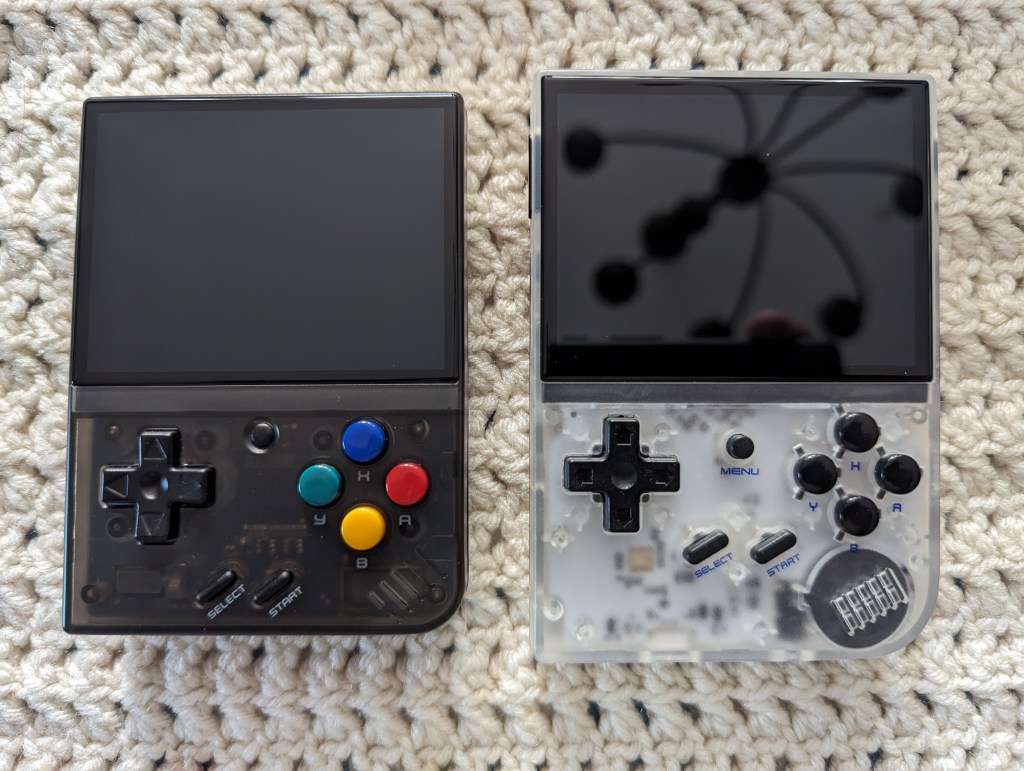
As you can see they are both very similar in design both deeply inspired by the original Game Boy, down to the curve on the bottom right and the speaker being located there as well.
Things change on them both when you go above the controls. Both units sport a 3.5 inch IPS display at a resolution of 640×480. They are not the same when it comes to colour and brightness. The RG 35XX gets quite a bit brighter but the trade off is in colour. The colour is more saturated and to me more pleasing on the Mini+.

Let’s look a little closer at the Miyoo Mini+. Below the screen you have all your expected buttons. The d-pad reminds me of what was on the original NES control pad though perhaps a little looser. It’s made out of nice plastic with a grippy texture. Below you have the Select and Start buttons. They are a nice texture plastic that simply actuate dome switches underneath. Straight up you have your menu button. This acts as a home button when in game as well as a hot key that works in combination with other buttons to control Retro-Arch (more on that later). The face buttons are labelled in Nintendo orientation and coloured to match the super famicom.
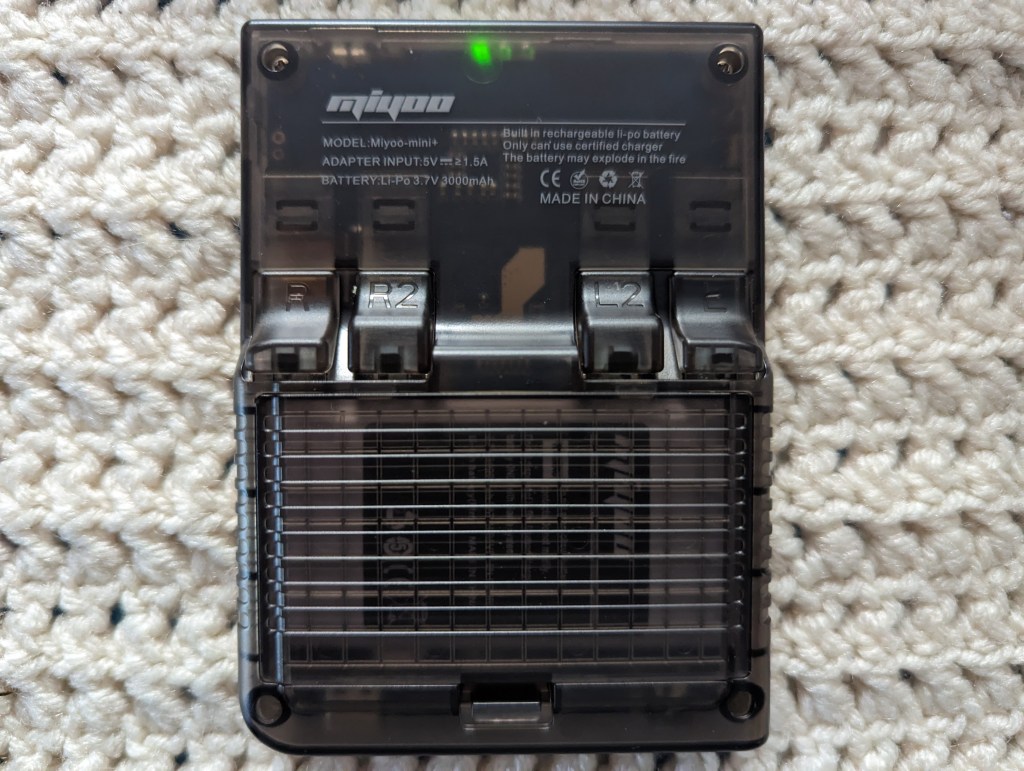
Around back you can see the Miyoo branding and below that the L1, L2, R1, R2 buttons. In an attempt to make the 1 and 2 levels of these buttons easier to tell apart Miyoo has raised the 2 buttons. In practice this rarely really made any difference to me as I never touched the 2 buttons at all. They do act as a nice place to rest fingers though since the device is so compact. They are also decent to press on only required a little travel to activate the switches below them. Below those buttons is the battery compartment housing the decently sized 3000 mAh battery. I appreciate Miyoo making it easy to access the battery without opening the whole device up.
The whole case is a nice frosted black and has a nice grippy texture that feels really nice in the hand. Around the left side you will find volume rocker. On the top you have the power button along with some lights for indicating power and such. The right side of the Mini+ doesn’t have any stories to tell and the bottom has your 3.5mm headphone jack, single micro-sd card slot and a USB-C port for charging.
Now when it comes to the firmware installed I immediately backed up what the Mini+ came with and did a fresh install so I can’t really comment on how it ran from the factory. All my research to this point said to do this as it would increase the performance and capabilities of the console. And so I did. So with a fresh install of OnionOS I have to say, this device is exceptionally easy to navigate and quick. And with the built in Wi-Fi you can easily download updates to the OS over the air. This same wi-fi can be used to play networked games. In the instance of Pokémon it will allow you to connect to other Mini+ consoles and trade Pokémon. That’s a big deal to those of use who love Pokémon.
OnionOS gives you a favourites section. It also has a search built-in in case you have a large library and want to search for a specific game. And if you don’t like the interface style you can change the theme in the Settings menu. Launching a game is as simple as selecting the game and playing. You don’t need to get into the nitty gritty of integer scaling or aspect ratio. But just the same you can by using the hot-key combo to open the Retro-Arch menu. In here you can set all the core (emulator) settings and the global Retro-Arch settings. Retro-Arch is the back end many of these emulation devices use to run the games installed. It’s highly configurable and is available on pretty much anything you can imagine.
Let’s talk about the Anbernic RG 35XX. In many ways this device is almost exactly the same as the Miyoo Mini+ despite having a quad core CPU (4x ARM Cortex A9 instead of the dual core CPU (2x ARM Cortex A7) in the Miyoo Mini+. It even has a GPU (a lower end – PowerVR SGX544MP). In almost every other case the RG 35XX is nearly the same device. It has the same button arrangements though there are some differences in the the button shapes.
Specifically the d-pad. The d-pad on the RG 35XX is larger but skinnier. And the sides of the d-pad are far less curved making them a little sharper in use. Though I didn’t find this fatiguing during use I can certainly see this being a problem for others that may use the console. I do prefer the tighter feel of this d-pad though so those that say Anbernic has that down, they are right. All the other button feel basically the same as the Miyoo however the Select and Start on the RG 35XX have the same feel as it’s face buttons instead of the Mini+’s direct micro-switch feel. I do prefer the RG 35XX in this instance but the Mini+ Select and Start buttons feel fine too, just a different flavour.

Around the back you see the L1, L2, R1, R2 buttons. Anbernic decided to put these straight across. For me again this is fine as I only ever used the 1 buttons of both. And in the case of a friend of mine he found the RG 35XX more comfortable to hold in this configuration as well with his bigger hands. I also think the more scooped style of these triggers lends to holding the device a little more soundly as well. There is no access to the 2600 mAh battery in the RG 35XX without opening the console up which is a shame. However in either case of the RG 35XX or the Mini+ it really isn’t that much of a chore to open either shell.
In my case here the whole case is a frosted clear colour allowing one to view the tastefully white PCB and components underneath. The RG 35XX has a slightly grippier texture in it case texture than the Mini+ which also makes it slightly easier to hold. Of course the overall length of the RG 35XX also helps being about a half inch longer than the Mini+. Along the left side is your volume rocker. Up top is your indicator lights and mini-HDMI port. Along the right is your power button, a reset button and two micro-SD card slots. One for the OS and the second for your roms and such. The one slot can be used for your roms as well in a single SD-card configuration. Along the bottom is a 3.5mm headphone jack and your usb-C charge port.
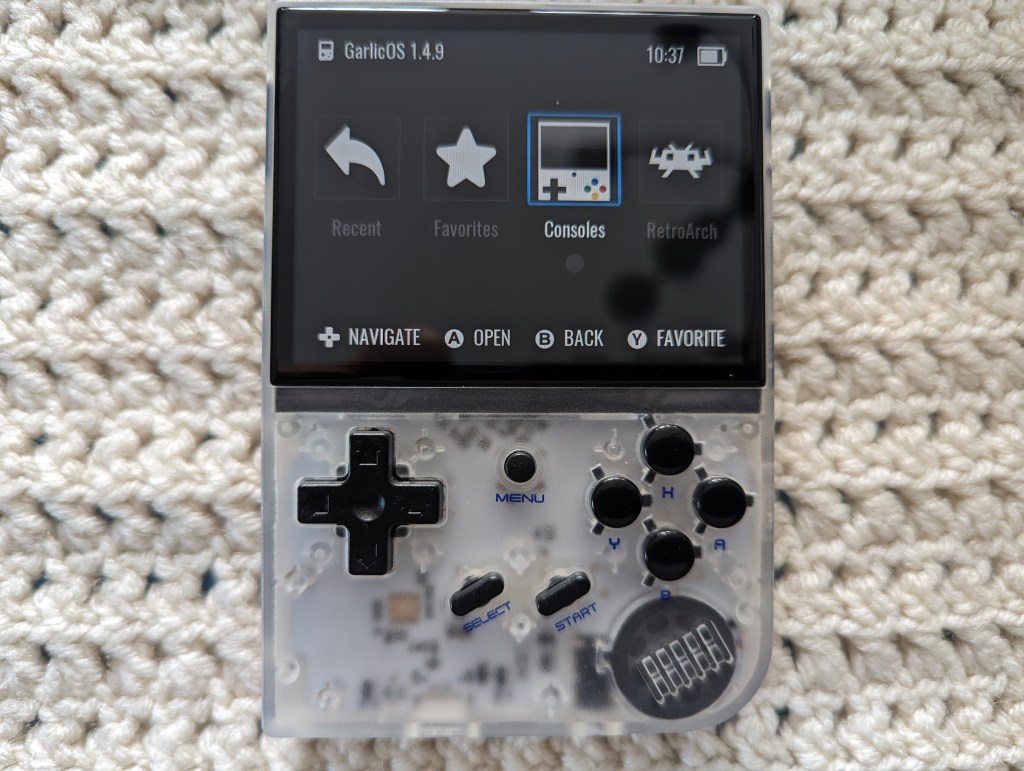
I immediately did a fresh install of GarlicOS on the RG 35XX and never looked back. It is very similar to OnionOS on the Mini+ though much simpler. There is a lot of configurability built-in but it requires you to get in to modifying text files and such and I am not interested in that. GarlicOS on the Mini+ has a lot of that configurability built in to the user interface. The RG 35XX uses Retro-Arch to emulate as well so it’s a very similar experience at this point between both handheld consoles.
After installing the custom OS’ on both systems the experience between both really comes down to the hardware. They can both emulate up to Playstation One though I wouldn’t do that without having access to joysticks personally. And even being down two CPU cores and lacking a GPU, the Mini+ still performs almost as fast as the RG 35XX.
During gameplay I preferred handling the Miyoo Mini+. But it was so close. I think the slightly looser D-pad is what did it for me. It makes it slightly easier to change directions in Sonic the Hedgehog. There is a benefit to the tighter D-pad on the the RG 35XX though. In RPGs I found accidentally overshooting a command was a lot harder on the RG 35XX than the Mini+. I would say with some real playing and getting used to either that would mitigate that issue.
Setting up GarlicOS and OnionOS while easy for someone with some technical knowhow is pretty easy but for someone without that technical know how may have a harder time installing them. Really I will have to get a couple more to compare to the original experiences. I very briefly tried them both before and found the performance on one to be severely lacking initially. I just don’t remember which right now. With the new operating systems they are much better.
Sound gets pretty loud on the RG 35XX and almost on the edge of distorting. It never did but it is right at that edge. On both consoles though they both went louder than I would ever use them. And if I needed to have the speaker that loud in a loud environment, I would just plug in some headphones.
Both of these are the same price on Amazon right now at $115 CAD with a 64GB card. They both come with games preloaded as well. It’s a pretty good deal for both.
Would I buy either for the price? Yes. I think they are both worth it.
But which would I buy? It’s a tough question. I really like them both. But I’d have to go for the Miyoo Mini+. It has wi-fi built in for Pokémon trading and OTA updates. The RG 35XX does have a mini-HDMI port which would likely be handy for some but for me, if I want to play these games on the TV, I’ll just hook up the console I already own and play them. You can buy either console on Amazon (usually for a small mark up), Aliexpress (Miyoo), Aliexpress (RG 35XX) and directly from Miyoo or Anbernic.
SPECIFICATIONS
| Miyoo Mini+ | Anbernic RG 35XX | |
| CPU | ARM Cortex A7 1.2GHz | ARM Cortex A9 1GHz |
| Core Count | 2 | 4 |
| GPU | None | PowerVR SGX544MP |
| Memory | 128MB | 256MB |
| Storage | 64GB Micro SD Card (Expandable to 128GB). | 64GB Lexar Micro SD Card (Explandable to 512GB). Two available slots. |
| Battery | 3000 mAh | 2600 mAh |
